
In this tutorial, we’ve combined two key building blocks of the machine learning loop (MLL), data versioning / data lineage with model serving, using Pachyderm and Seldon.
What is the MLL? Think of it as the actual steps behind an MLOps workflow.
The term MLOps caught on like wildfire last year but what does it really mean? Too often it’s a looking glass that means whatever a marketing team wants it to mean but a true definition of MLOps is the practical steps a model takes as it goes through its journey from training to production. That’s the MLL. It follows the ML development cycle from beginning to end.
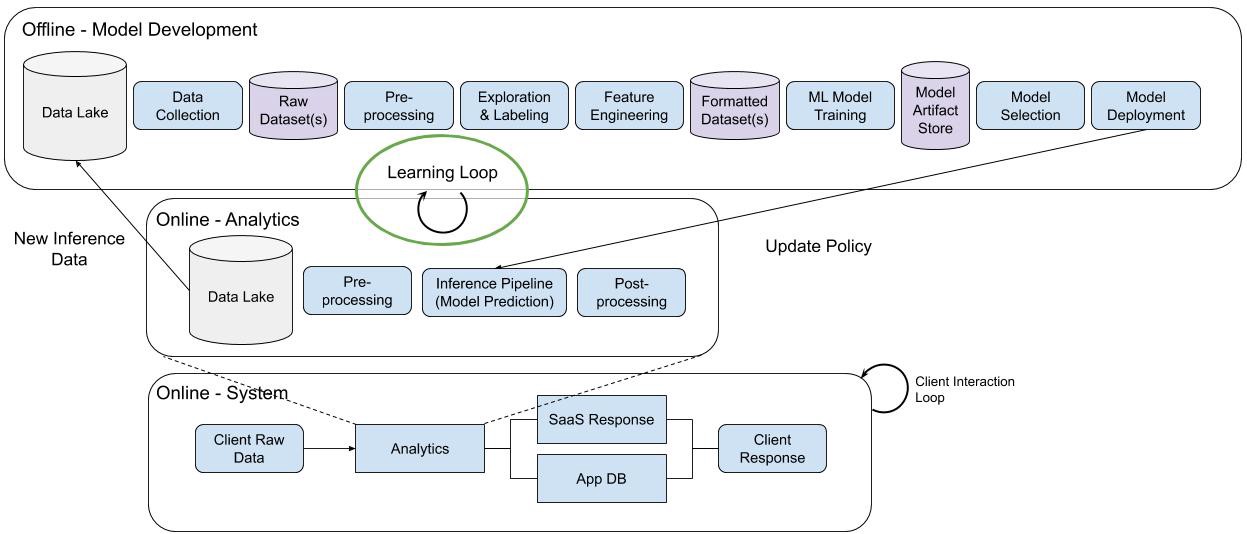
Creating a working model isn’t the end of the story, it’s the beginning. It gives you a good starting point, but unlike code, an ML model is never really done. As soon as the model encounters real-world data, that’s when development begins. Whether it’s data drift, performance improvements, or even black swan events like a global pandemic that can change how your model needs to interpret the world in a flash. You’ve got to monitor, diagnose, refine, and improve the model to keep up with an ever changing world.
Too often in machine learning we try to port over the design patterns from traditional software development. There’s a lot of overlap between DevOps and MLOps but they’re not a perfect 1 to 1 match. In DevOps, code takes center stage. The logic is hand coded and the files programmers work with when they pull down a repository from Git repository contain that hand tuned logic. But with ML, the systems learn their own rules by studying data for patterns. That makes the data center stage in the design and development of machine learning models and that’s where Pachyderm comes into the picture.
Pachyderm delivers powerful data versioning and data lineage to your machine learning loop, as well as a slick, flexible pipeline system that lets you bring any tool or framework into your transformations steps. It uses containers to package up those frameworks, so it doesn’t matter if you bring in a shell script in step one, some pytorch in step two, a little R in step three and anything else you want to bring to the table.
Data versioning is accomplished through a copy-on-write file system that fronts an object store, like S3. You take the infinite storage of the cloud and you put a system in front of it that can keep track of every change in your data without you needing to make a lot of inefficient and conflicting copies of that data. The lineage system is inspired by Git. Every time you make a change a commit happens automatically in the background and the data scientist doesn’t have to remember to call it, so you get data snapshots and the lineage of those snapshots in a single pass.
Why not use Git itself?
Pachyderm can use GitHub actions and Git for the code in your pipelines but unfortunately, Git wasn’t built for data. It’s a square peg in a round hole.
Some projects have tried to force that peg into the round hole but in the end it’s a broken design pattern that doesn’t port over to large scale data science teams. For instance, Git pushes and pulls data up and down over the web. That’s fine when you’re working with 20 MB of hand tuned logic, but what happens when every data scientist on your 30 person team is pushing and pulling down a 2TB dataset to their laptops? Do they even have that much free space? How long will it take to get there in the first place?
Pachyderm centralizes the data so data scientists aren’t pushing and pulling it around the web. It takes the best concepts of Git for tracking and let’s scientists connect to remote data stores and pipeline engines with ease.
Seldon handles the model serving. In this tutorial we use Seldon Core, an open source platform for deploying machine learning models on a Kubernetes cluster. Since Pachyderm also uses Kubernetes to scale, it’s a fantastic match. Seldon Core lets you deploy ML models on the cloud or on-premise. It gives you the metrics you need to ensure proper governance and compliance for your running machine learning models. Once you’ve built and trained your model in Pachyderm, you use Seldon Core to push it into production and keep track of which version is running.
We’re going to follow along from this Jupyter notebook and the Seldon documentation to quickly get a model through the stages of the machine learning loop and into production.
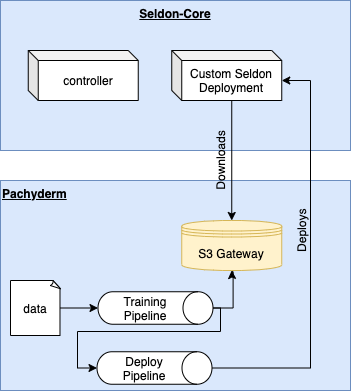
Getting it All Working Together
In this example we use of Pachyderm’s S3 gateway, where version controlled pachyderm repositories are exposed via an S3-like API. That means that Seldon-Core’s pre-packaged model servers, which typically read from blob storage, can read directly from Pachyderm.
Prerequisites
- A kubernetes cluster with kubectl configured
- A seldon-core cluster installed and configured
- curl
- Pachyderm’s pachctl binary installed following the official documentation
Pachyderm is controlled and deployed via the pachctl. This document assumes that you have version 1.11.8 installed, although it should work with any 1.x.x version.
- Installing Pachyderm
Use pachctl to deploy Pachyderm to your cluster. In the command below I disable the pachyderm dashboard because it is not used in this example and I intentionally disable sharing of the docker socket to reduce the chance that rogue containers can access my system.
- Add the Training Data
Note: If you are using a non-standard Pachyderm namespace, you will need to run pachctl port-forward in a separate terminal.
Before we train a model, I will first create a new Pachyderm repository to version control the data, then commit the training data to that repository. You should be able to see iris.csv in the master branch of the repository training.
- Train the Model Using a Pachyderm Pipeline
Pachyderm Pipelines are the foundation of the Pachyderm platform. They read data from a specified source, defined as a Pachyderm repo, and transform according to the pipeline configuration you define in JSON or YAML files. They then write the result of that stage of your pipeline to an output repo where you can complete the pipeline or define another stage the feeds from the output repo.
A Pachyderm pipeline forms a directed acyclic graph (DAG) that shows the transformation of your model on its way through the machine learning loop.
Here we define a simple pipeline that is inspired by a similar Pachyderm example. It accepts training data, trains a logistic classifier, and returns a pickled model in joblib format.
We use a container built from the iris-train-python-svm directory to perform the training, but you could use your own. The input is defined to be the training Pachyderm repository and the output gets stored in a repository with the same name as the pipeline (model). Remember to push the container to somewhere that the cluster can access. For example, you can use the make kind_load target in the Makefile to push the container to a kind cluster.
- Verify Pipeline Success
It may take a while for the job to start the first time, as Kubernetes may need to pull the container. But before long you’ll see that the job completes and a new file gets committed to the master branch of the model repository.
- Deploy Seldon-Core Powered Sklearn Server
Now that you have a model artifact, you can use Pachyderm’s S3 gateway feature to directly load the version controlled model into a Seldon-Core deployment.
The key is to create a container secret that points to the pachyderm cluster on the right port. If you installed Pachyderm by following this tutorial, then it will have installed with no credentials. In this case the corresponding access key and secret are not used but they still have to be set. The endpoint URL points to the in-cluster FQDN of the pachyderm service on port 600.
Next you can deploy your sklearn-based Seldon Deployment in the usual manner, using the following format for the S3 bucket: s3://${branch}.${repository}/${directory}. Since our model is written to the root of the directory, the final s3 modelUri is s3://master.model.
- Test the Deployment
Now that the deployment has completed, you can call the model predict endpoint via the port-forwarded ingress FDQN and the seldon-core API. The input matches the convention expected by the model (set by the training data) and results in predicted class probabilities.
- Bonus: Rebuilding the Model
The beauty of having models version controlled is that when you change the data, you can automatically retrain the model.
Below we’re overwriting the old training data with a slightly smaller version of the same. When we do this, the pipeline notices and automatically runs. That means that the model artifact is regenerated and placed back in its repo.
At the end, all we need to do is restart the pod to get Seldon-Core to reload the model from it’s S3 endpoint. You’ll see in the final call of the predict endpoint that the result has changed, even though we’re passing in the same input data. This is because the decision boundaries have changed slightly due to the different training data distribution.
Cleanup
That’s a Wrap
If you made it all the way to the end then you’ve walked through some of the key steps in the machine learning loop. With Pachyderm you’ve ingested data, wrangled it, defined a set of steps to train the model and then you used Seldon Core to deliver that model artifact to production.
In the real world you’d automate a few of these deployment steps with more checks and balances, but you’re well on your way to using data versioning, data lineage and serving to get a model trained and into production the right way. This is a method that can scale from small projects to much bigger projects across time zones and data centers.
The more you build the foundational layers of a machine learning loop, the more your team can focus on data science instead of data engineering.
Recent Comments