
with VS Code and Bridge to Kubernetes
At Modzy we’ve developed a microservices based model operations platform that accelerates the deployment, integration, and governance of production-ready AI. Modzy is built on top of Kubernetes, which we selected for its scheduling, scalability, fault tolerance, and fault recovery capabilities.
In spite of the myriad of benefits Kubernetes offers, we encountered one major challenge that was holding up our development process: the fact that Kubernetes runs immutable containers in an isolated context. While this factor is great for production, during development, you’re left with few debugging choices, most of which are the modern-day equivalent of using print statements to see what your code is doing.
Our original development processes looked like this:
1. Write code
2. Build the code it into a container locally
3. Push the container to a test repo
4. Deploy the container to our QA cluster to test our code /patches
This process led to unacceptably long development cycles. We needed something more interactive and found a possible solution in VS Code’s Bridge to Kubernetes extension.
Bridge to Kubernetes reroutes internal cluster network traffic to your local machine.
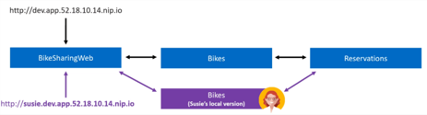
It does this by closing down the pod running the microservice you want to intercept (For example Susie wanted to intercept “Bikes”). B2K then inserts a pod that reroutes cluster traffic destined for the microservice of interest to your local machine. At the same time the extension launches the rerouting pod, it also launches a debug session locally on your machine. By setting VS Code to launch the code associated with the microservice that is being rerouted during the local debug session we can interactively debug the microservice code, fix any problems, and build a new container for the microservice. This was exactly the kind of solution we were looking for.
Unfortunately, we didn’t find any working examples for how to use B2K in our development situation: a remote Kubernetes cluster running python-based microservices that need to be debugged locally. Fortunately, we’ve figured out a solution, which we’ve documented in this tutorial.
In this tutorial, you’ll use a few installs and downloads to set up minikube on an EC2 instance. You’ll then install a python based open source project in minikube via Helm, and finally learn how to route traffic destined for that service to your local machine for interactive code debugging.
What do I need to get started?
For this tutorial, you’ll need the following installed on your local machine:
- Python 3
- VS Code
- Python extension for VS Code
- Remote -SSH (VS Code extension)
- Bridge to Kubernetes (VS Code extension)
- Kubectl binary (Docker installs this by default so you may already have it. If not VS Code will prompt you to download it)
Setting up EC2 with Minikube
First, you’ll need to get an EC2 instance up and running. For this walk through, I recommend using a t3.xlarge image with an ubuntu 20.04 AMI, 32 GB Storage, and a security group port opening for inbound minikube traffic. The inbound port needs to be configured as 8443
· custom| port 8443 | CIDR <check with your Admin> | name “minikube”
Install Minikube and Dependencies
To get minikube up and running on an ec2 instance, refer to this guide: Running Minikube in AWS EC2 (Ubuntu) . The following is a step-by-step set of instructions for getting everything you need set up:
- Log into your new instance through VS Code via Remote SSH using your ssh key (if you use a .ssh folder with a config file, make sure to update the config file with the instance’s IP and key information)
- Open a terminal on the ec2 instance in VS Code
Install kubectl (Kubernetes CLI)
- curl -LO https://storage.googleapis.com/kubernetes-release/release/`curl -s https://storage.googleapis.com/kubernetes-release/release/stable.txt`/bin/linux/amd64/kubectl
- chmod +x ./kubectl
- sudo mv ./kubectl /usr/local/bin/kubectl
Install socat (needed for minkube ingress services)
- sudo apt-get install -y socat
Install Docker (needed for minikube functionality)
- sudo apt-get update && \
- sudo apt-get install docker.io -y
- sudo groupadd docker
Add user to docker group (so that sudo isn’t needed for everything)
- sudo usermod -aG docker $USER
- newgrp docker
- Install conntrack ( needed for minikube )
- sudo apt install conntrack
Install Minikube
- curl -Lo minikube https://storage.googleapis.com/minikube/releases/latest/minikube-linux-amd64 && chmod +x minikube && sudo mv minikube /usr/local/bin/
Install helm ( Kubernetes package manager)
- curl -fsSL -o get_helm.sh https://raw.githubusercontent.com/helm/helm/main/scripts/get-helm-3
- chmod 700 get_helm.sh
- ./get_helm.sh
Running a Microservice on the Cluster
Now that you’ve installed Minikube and its dependencies, the next step is getting a microservice running on the cluster. For this tutorial, we’ll use Chassis (Chassis.ml), an open-source, python-based, microservice for machine learning model containerization. Chassis can be installed by using the official helm installation repo; however, for the purposes of this tutorial, we’ll clone the git repo and install locally. This will help you more easily adapt this process for use with your own microservices.
To git clone Chassis and build its service, you’ll need to:
Git clone the Chassis repo
- git clone https://github.com/modzy/chassis.git
Build the Chassis container
- cd <path to the chassis git clone repo>/service
- docker build -t chassis-image:latest .
With a completed Docker build, you can now get the Chassis service up and running on the Minikube cluster by executing these operations:
Install Chassis into Minikube with Helm
Start minikube : the flags below are extremely important for being able to run minikube in an accessible way on an EC2 instance. Do NOT alter them.
- minikube start — vm-driver=none — apiserver-ips=<EC2 IP Address>
Use helm to install the chassis charts. Note that the dev charts are the ones you want for a local installation. They have certain environmental variables preestablished for you.
- cd <path the chassis git clone>/chassis-dev-charts
- helm install chassis .
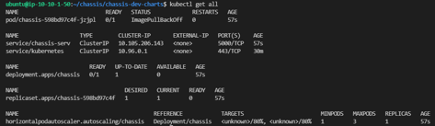
Check to make sure deployment was successful:
- kubectl get all
- you should see chassis in pods, services, and deployments
After Chassis is running on Minikube, you need to set up an ingress service to access the microservice from outside the cluster; this allows you to reach Chassis from outside the cluster. Here’s what you need to do to make Chassis accessible from a remote / noncluster computer:
Add the nginx ingress controller.
- minikube addons enable ingress
Expose the Chassis deployment with the ingress
- kubectl expose deployment chassis — type=NodePort — port=5000
the port is assigned based upon the needs of the container. 5000 is the default port for flask which is the webserver that Chassis leverages.
Identify the port being used for ingress.
- kubectl get services

The ingress port will be the 30000+ port number for the chassis service (e.g. 311191)
- Update the EC2 security group to include the ingress port number

Test that the ingress is resolving network traffic to chassis.
- curl <ec2 IP address>:<ingress port> (e.g. curl 10.10.1.50:31191)
- chassis returns “Alive!” by default so you should see this

At this point you have successfully installed Chassis into a Minikube cluster on an EC2 instance and setup an ingress route for accessing it.
Downloading the Minikube Authentication Files
Now it’s time to download the kubeconfig and related files that Bridge to Kubernetes will use to connect to your cluster. To get started:
Download the kubeconfig file along with the 3 files pointed to by the kubeconfig file: certificate-authority, client-certificate, and client-key keys. The default locations are:
- ~/.kube/config
- certificate-authority: /home/ubuntu/.minikube/ca.crt
- client-certificate: /home/ubuntu/.minikube/profiles/minikube/client.crt
- client-key: /home/ubuntu/.minikube/profiles/minikube/client.key
Place the files wherever you want on your computer. I chose
- C:\Users\******\deleteables\b2k
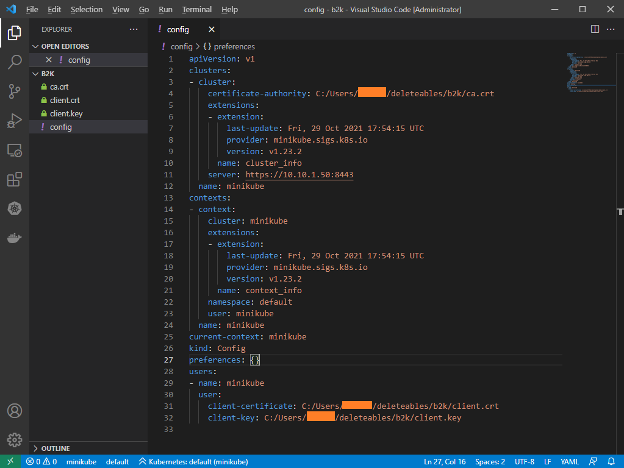
Alter the config file to point to the new locations of the crt files and key file. Mine went from this…
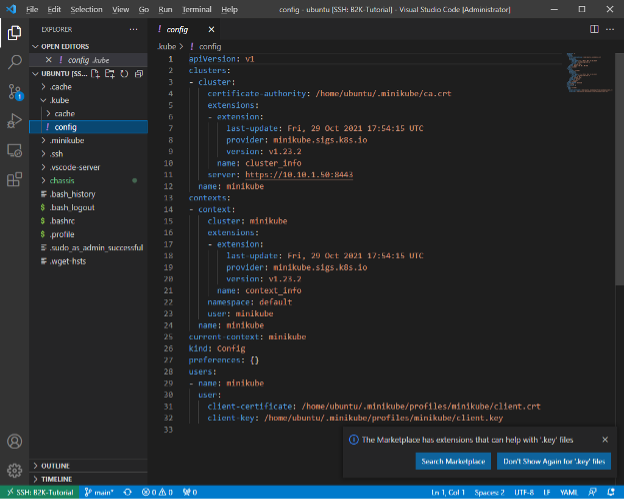
…to this.
You’re almost there! Now you have everything you need to communicate with the minikube cluster on the EC2 instance from your computer. Next, you’ll set up your local development environment.
Setting Up Your Local Development Environment
Since you’ll be debugging from your local computer, you need a local copy of the Chassis code. To get the local copy up and running:
If you haven’t already, git clone chassis to your local machine
- git clone https://github.com/modzy/chassis.git
Open the local chassis git repo folder with VS Code
Open a terminal in VSCode and setup a python venv for chassis
- python3 -m venv /path/to/VIRTUAL_ENVIRON_NAME
Change VSCode to use the venv you just created
- press “F1” start typing “Python: Select Interpreter”
Open a new terminal so that the venv is active. The prompt should have the venv name to its left.
Pip install chassis requirements
- cd <chassis install location>/service
- pip install -r requirements.txt
Setting Up Your Debug Configuration
With the virtual environment set up, you can now set some breakpoints in the Chassis code and make sure that you can debug locally. This locally running code is what will intercept the traffic from the minikube cluster and allow you to debug the service’s code.
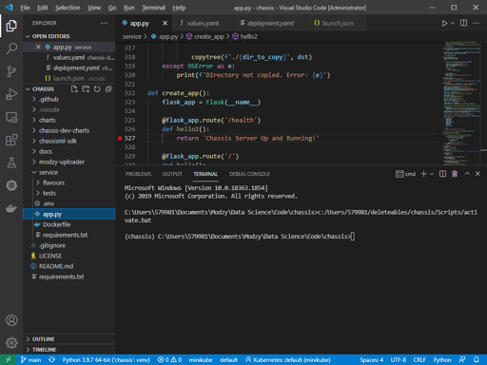
- Open the app.py file in the repo and place a break point at the “/health” route.
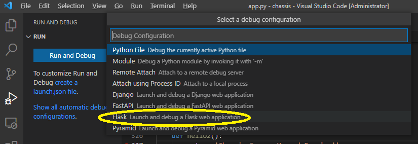
From the debug menu click “create a launch.json file“
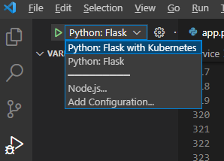
Select “Flask” for configuration
When given the chance to specify the path to the app.
- Specify the full path to your app so there is no confusion (a relative path to app.py is the default)
- Mine was “C:\Users\******\Documents\Modzy\Data Science\Code\chassis\service\app.py”
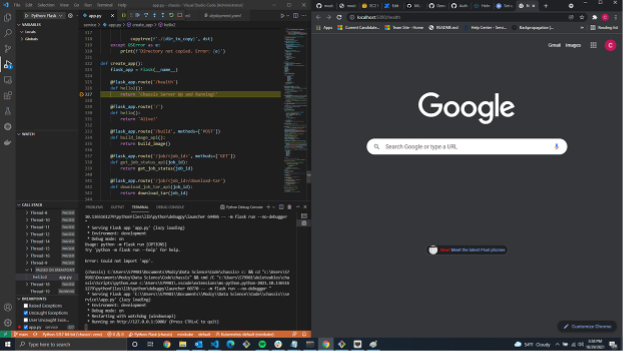
You now have a launch configuration and can click the “play“ button on the Run and Debug menu next to the drop down menu
- When you do, VSCode will turn orange at the bottom.
Open a browser and go to “localhost:5000/health” (which is where chassis listens by default).
- The breakpoint you set should catch like this
Stop the debugger by clicking the hollow red square at the top of the VS Code Window.
Setting Up Bridge to Kubernetes Connection
Now that the cluster is running, and the local copy of Chassis has a valid debug configuration, it’s time to set up your Bridge to Kubernetes connection. This is the moment you’ve been waiting for — after this step, you’ll be able to debug the cluster locally!
- In VS Code, select the Bridge to Kubernetes plug-in
- Click the ellipses next to “Clusters,” and select “set Kubeconfig”
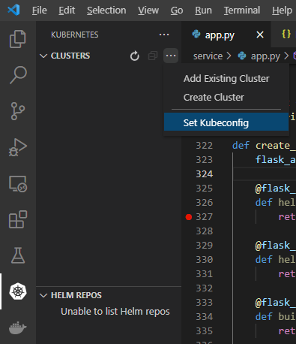
When the dropdown opens, select “add new kubconfig”
- Use the explorer to find the config file you downloaded and altered from the EC2 minikube cluster
- A blue line will move under clusters and finally “minikube“ will appear underneath
Press F1 and type “Bridge to Kubernetes: Configure” in the text box
When asked what service you want to connect to, select “chassis-serv;” this is the service installed by the helm charts for chassis
When asked for a port, choose “5000”. The port you choose is the port through which all traffic will be routed on your local machine. Since chassis listens on 5000 when you are debugging, you need to use 5000
When asked for a launch configuration, choose Python Flask. Bridge to Kubernetes will use this configuration to create a new configuration. IT IS VERY IMPORTANT THAT YOU HAVE TESTED THE CONFIGURATION YOU CHOOSE. The debugging configuration setup you completed earlier is designed to give you a confirmed working launch configuration for use here.
When asked about what to reroute, choose “No.” This will reroute all cluster traffic destined for chassis to your local machine.
Once the Bridge to Kubernetes Launch configuration is setup, you need to ensure that Kubernetes environment variables are available during debugging:
- Open task.json in the .vscode directory hosting the launch.json file.
- Change “useKubernetesServiceEnvironmentVariables” from “false” to “true”
- Save the task.json file
That’s it! You’ve set up everything needed to use Bridge to Kubernetes on an EC2 instance. To send information through the cluster that will then be rerouted to your local breakpoint, follow these steps:
- From the debug menu, select the launch configuration that has the word “Kubernetes” in its name. Click play
- In your web browser, go to “<ec2 ip address>:<ingress port>/health;” you will hit the break point that we set earlier when we were debugging locally
Once you follow these steps and hit the break point, you can debug the service like you would any code on your local machine, because the code executing is on your machine. As long as you have the same code on your machine and the cluster, you can use this technique to troubleshoot your containers and develop at a standard pace instead of through trial and error using print and logging statements.
Wrap Up
Debugging code execution on a Kubernetes cluster is a niche requirement in today’s world, but at Modzy, we believe it will be a vital skill as tech shifts into a more microservice centric paradigm. As of this writing in early 2022, the tech available is nascent, and at times, more fragile than the community would like. We’re experimenting with a variety of technologies to accomplish real time debugging for remotely executing cluster code. We hope that this tutorial saves others the headaches we experienced starting out and accelerates development timelines to a more acceptable production-grade cadence.
For more on running and scaling ML models: visit the Modzy website or check out our Discord server.
For more on model containerization: visit chassis.ml.
This blog has been republished by AIIA. To view the original article, please click HERE.
Recent Comments