Introduction
These days, artificial intelligence is a part of our everyday lives. Whether it’s the sensors in our cars telling us not to switch lanes or a camera filter on our smartphones, machine learning algorithms are being put to work. In the past 20 years, we’ve watched technology progress and, in a way, become an extension of ourselves. Even since the start of the pandemic in March 2020, we’ve watched major corporations such as Amazon and DoorDash utilize robots to carry out basic functions such as food delivery and supermarket cleanup. Seeing robots at the grocery store is nothing short of strange to the everyday person, especially initially, but it’s also an amazing and fascinating sign of innovation. The more scientists and engineers invent self-sufficient technology, the more they utilize artificial intelligence to solve some of our basic and most advanced problems.
Building computer vision models is nothing short of complex, intricate, and challenging for machine learning engineers and the teams behind them. Your model must learn to identify hundreds of thousands of objects in a dataset made up of potentially thousands of images or hours of videos. Training your model to understand real-life materials is much like a baby learning their surroundings. But because your model is manmade, the approach to “teaching” it is much different.
What Are Bounding Boxes?

Machine learning algorithms and datasets are used to train your computer vision model, but teaching the model to identify objects the way a human can require pre-labeled images for object detection. This is where bounding boxes come into play:
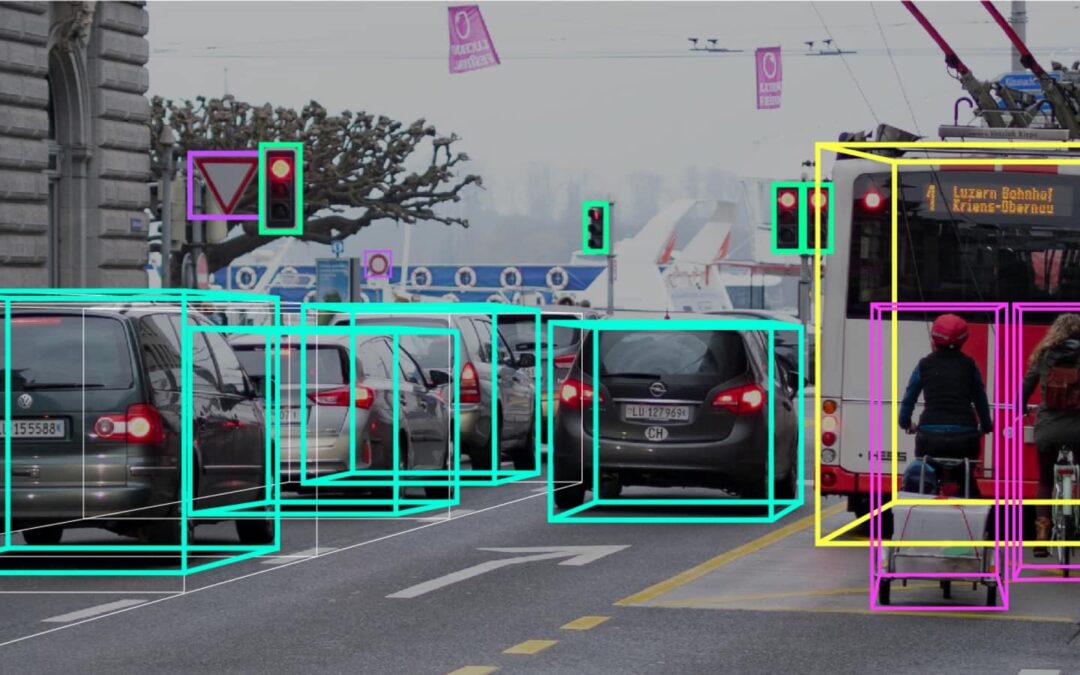
Bounding boxes are annotation markers drawn around the objects in an image. The boxes, as the name implies, are rectangularly shaped. Each image within your dataset will require a different number of bounding boxes depending on what your model is trained to identify. As the images are fed into your machine learning algorithm, your model identifies various patterns and draws conclusions surrounding the objects. It can then apply them in real-life scenarios.
In truth, bounding boxes are perhaps the least involved method of data labeling, as they do not provide an exact outline of the objects in your images. However, annotating your dataset utilizing this method is still time-consuming. Many machine learning engineers outsource data labeling teams to expedite the process. That said, the long, monotonous data annotation process serves an important role in getting those robots in Whole Foods to mop the floors.
As previously noted, bounding boxes are the simplest form of data annotation, but they are used very frequently and serve many different purposes. Bounding boxes are used commonly in a wide range of use cases, including everything from autonomous vehicles to medical imaging, eCommerce, agriculture, and insurance claims, to name but a few.
Bounding Box Annotations: Tips, Tricks, and Best Practices
Drawing a bounding box with your cursor is a simple enough task, but there are strategies and best practices that shouldn’t be ignored. Here are a few of our favorite tips, tricks, and best practices.
1- Watch your borders

For your model to decipher the objects in each image, the bounding box must completely surround the object it’s annotating. At the same time, the annotation cannot exceed too far past the object’s borders, meaning that the bounding box should not extend past its edges. To do so would confuse your model and garner inaccurate results. If, for example, you’re building a machine learning algorithm to detect street signs for self-driving cars, a bounding box that includes the shape you’re looking to label, as well as miscellaneous information, will confuse your model. Even if most of your images are annotated correctly, this mistake can lead to inaccuracies.
2- Consider intersection over union
To highlight this concept, we must also consider something known as an IoU, or intersection over union. When labeling your images, drawing a bounding box that is true to size as part of your ground truth becomes an important part further down in your workflow, in which your model makes predictions based on your original submission. IoU is measured as the overlap between the ground truth bounding box and the predicted one. A perfectly predicted label would score a one, but that’s nearly impossible. Therefore, the closer your model’s annotation is to your ground truth, the more accurate it is.
3 – Size is key
In addition to the size of your bounding box in relation to your object, the actual object size is also relevant. If the object is small, it’s easier for an annotation to hug its edges more closely, and its IoU is less affected. On the contrary, when the object is large, its overall IoU is less impacted, meaning more room for error. In addition, the overall size of your object is also a factor. Larger objects tend to perform less accurately than if they appear smaller, and ML engineers should consider using an instance segmentation model instead.
4 – Pay attention to overlap

Bounding boxes are best used in scenarios where the objects are separate from each other because your model is trained to recognize IoUs. Overlapping objects will confuse your model and gravely affect the accuracy of its predictions. If the items are such that they frequently overlap, your model will not discern each object individually. Instead, consider using polygon annotations for an instance segmentation model. You’ll likely be much happier with the results.
5 – Diagonals are a non-starter
Many objects in the real world are made up of diagonal lines, such as a walkway, a bridge, or train tracks, so it’s understandable why we would want to include these annotations in our computer vision models. However, the rectangular shape of the bounding box cannot be modified to border the object tightly. Instead, there is a lot of data outside the item of interest that is also included in the bounding box. As humans, it may seem obvious that we’re most interested in the bridge, train tracks, or walkway, but your model is interested in all of the information inside the bounding box. Because of this, bounding box annotations are not suggested for models with diagonal-lined objects. Polygons and instance segmentation is a better approach in these cases.
Superb AI: Shortcuts for Faster Labeling
Knowing best practices and strategies for getting the most out of your dataset is a good place to start before diving into your project, but there are shortcuts within the Superb AI Suite that are also worth noting.
The Command Menu

The command menu is the best place to start when discussing shortcuts within our suite. Situated on the top right-hand corner of your screen, you’ll see a small search bar. There, you can click it and scroll through an array of functions you may need to use in your project. In addition, you can also navigate to this menu easily by using keyboard shortcuts, Ctrl+K on Windows or Linux, and Cmd+K on a Mac.
Using this command menu, you’ll find it easier to jump between different tasks. For example, you can navigate to the “Project Overview” dashboard and see essential statistics such as the labeling status of your dataset. See how many images have been submitted and approved and how many have been rejected. Invite other team members to work through the dataset, and review your Custom Auto Label. Jump to submitted labels, rejected labels, and those pending reviews. Basically, the Command Menu can help you switch between functions within the suite.
Annotate Your Data Faster

You can also take advantage of keyboard shortcuts to annotate your data. For example, you can use Ctrl/Cmd+C to copy bounding boxes of similar sizes, and Ctrl/Cmd+V to paste them. Adjust the position of your label by one pixel using the Ctrl/Cmd keys and the arrow keys, or use the arrow keys to move your bounding box by 10 pixels. Or change the thickness of your lines using the “-” and “=” keys, and easily switch between image sets.
The above tips and tricks are only a few of the time-saving strategies you can use in the Superb AI Suite. For more shortcuts, visit our documentation to start saving even more time on your computer vision projects.
Beyond the Boxes: What’s Next?
Now that you’re familiar with bounding boxes and some best practices around them, you’re ready to get started on your team’s latest computer vision project with improved accuracy, speed, and performance. At Superb AI, we strive to make annotating with bounding boxes as easy as possible. That’s why, in addition to things like the command menu and extensive shortcuts, we provide labeling automation that uses your unique data as ground truth to rapidly and accurately annotate datasets at scale.
Looking for more tips and ways to stay connected with everything going on in the world of computer vision and MLOps? Sign up for The Ground Truth newsletter to get resources, insights, and news straight to your inbox.
This blog has been republished by AIIA. To view the original article, please click HERE.
Recent Comments