Locking your screen from a raspberry pi and only unlocking it again when you did enough pushups, what a world we live in.
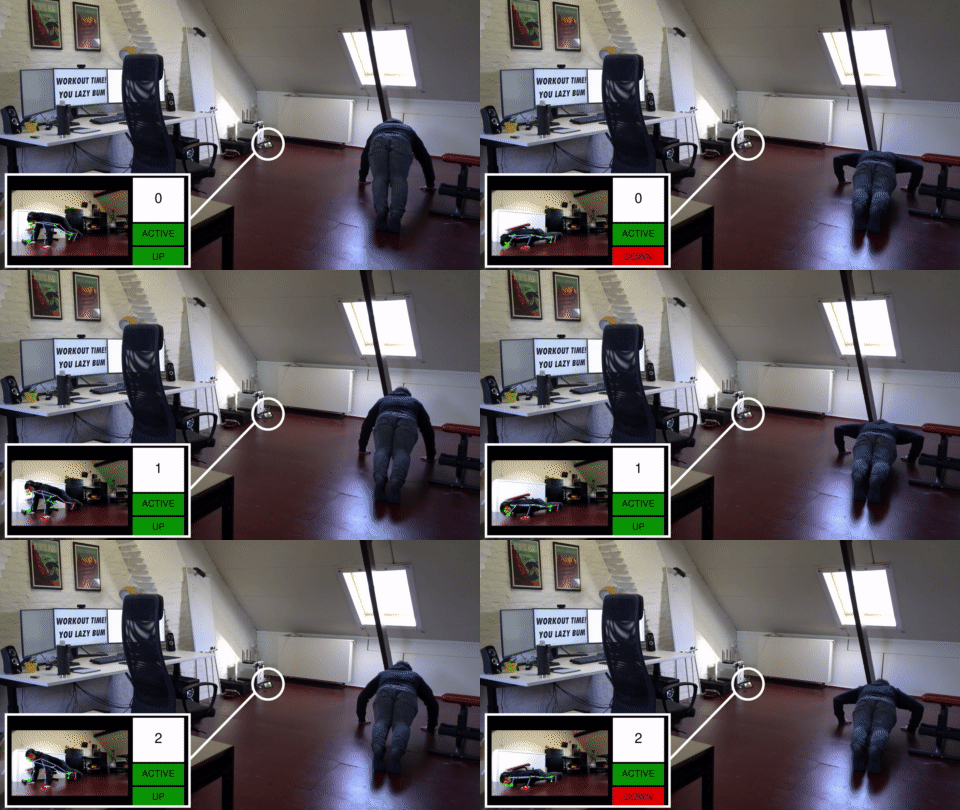
This is the more in-depth, accompanying blogpost of this youtube video, go check it out first if you haven’t already. While you don’t need to see it, it might be less interesting to follow along without that video as context.
In short, the idea is to lock my computer every hour and force myself to do some physical exercises to unlock it again. This is done by using a raspberry pi in the corner of my room connected to an AI camera, the OAK-1. The pi will remotely lock my PC and start counting pushups with the OAK-1 until it detected a certain number of them, then remotely unlock the PC again. This blogpost will cover some interesting technical challenges that didn’t make the cut in the video.
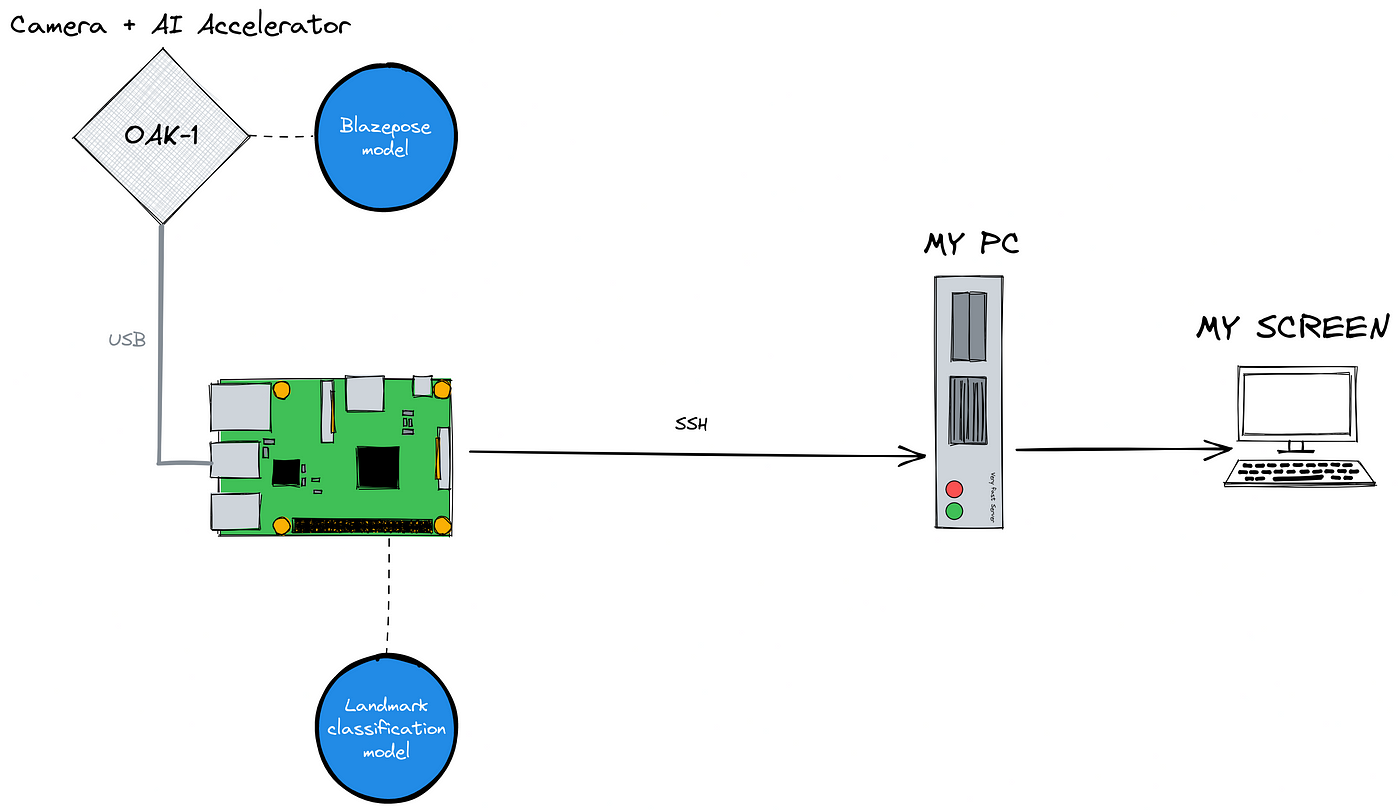
Locking the computer
I’m working on Linux, so this part should be easier than on other operating systems. And after searching around for a while, it became clear that there were going to be 2 major issues:
- Locking the screen automatically is easy, unlocking it again is hard.
- Almost every lock screen uses the password from the main system account
My preferred way of working is to create a minimum viable product. In this case, I want to be able to write a small program that can lock my screen, wait a little and then unlock it again. If that works, everything else is just integration. On Linux, most things like this are controlled by the command line, so the search for the right command is on!
Locking the screen is as simple as just calling the command of your screensaver of choice.

But unlocking is a different story (damned security always ruining the fun). After a while, the only solution seemed to be the loginctl unlock-session command, but I never really got it to work properly. These screensavers are invariably connected to the main system authentication, using the main system passwords, so none of these commands have a similar --unlock command argument.

In fact, we still have the second problem to deal with. I know the password so even if I could use these lock screens, how would I prevent myself from entering the password and ignoring the pushup system? I almost thought about automatically changing the system password to some random string and then resetting it when done, but that thought was quickly banned to the “catastrophically bad ideas” bin.
Then I thought of xdotool. This amazing utility allows me to send any keystroke from the command line, so if I find a good lock screen that captures the xdotoolkeystrokes while it’s locked, we’re golden! Then just spam backspace whenever the pushup detector is active and I can’t fill in my password!
Some lock screens require you to first click on the user or do some other annoying thing to bring the cursor to the password box, but i3lock doesn’t do that. It’s a lock screen that straight-up takes any and all keystrokes as password attempts immediately. Perfect.
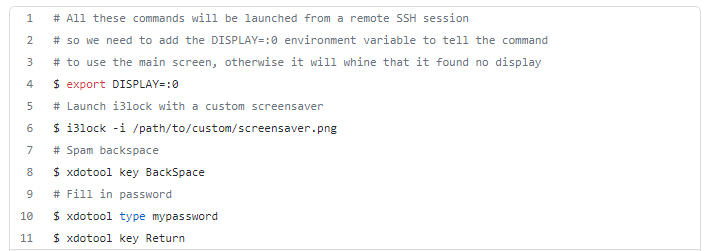
With this little script, the right part of our diagram is now ready to go. Just remotely connect from the raspberry pi over SSH to my PC and run these commands based on the logic inside the pushup detector.
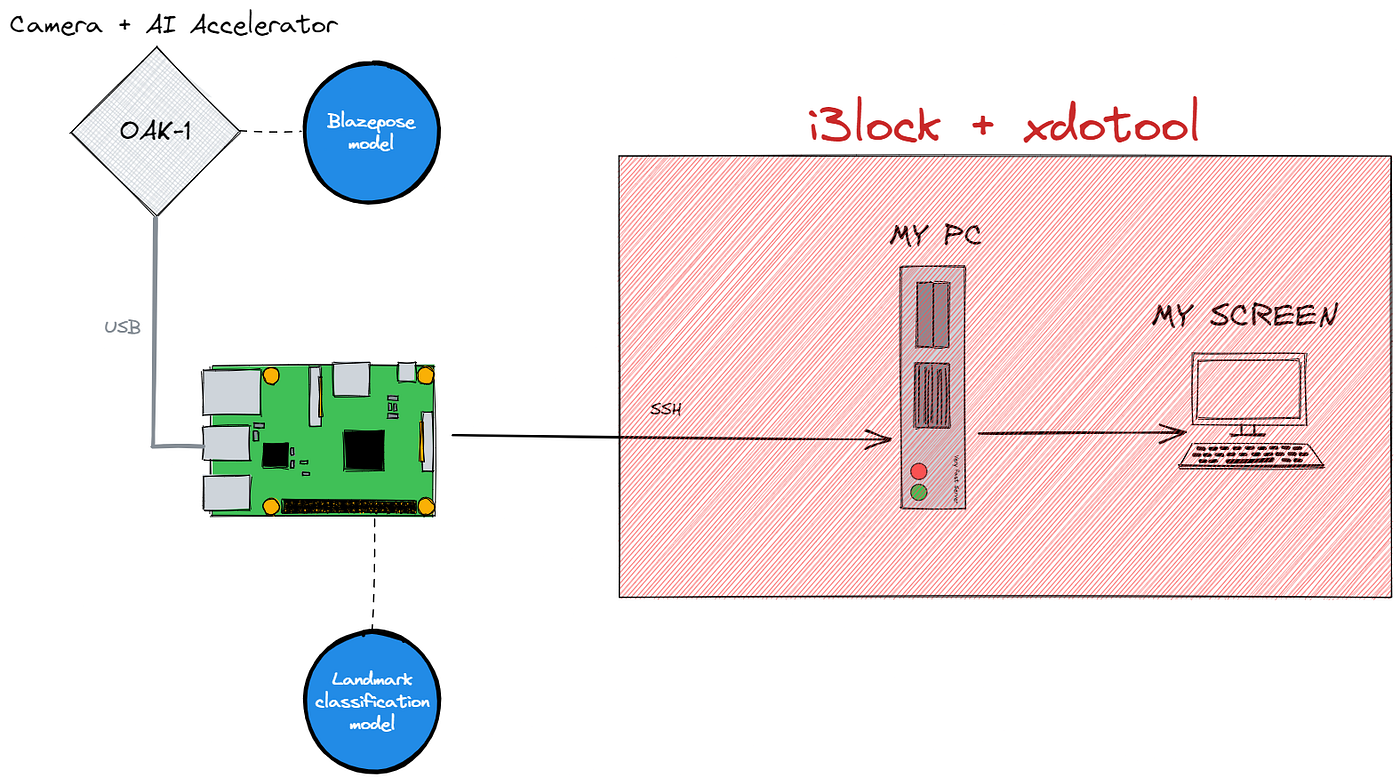
The machine learning
Blazepose
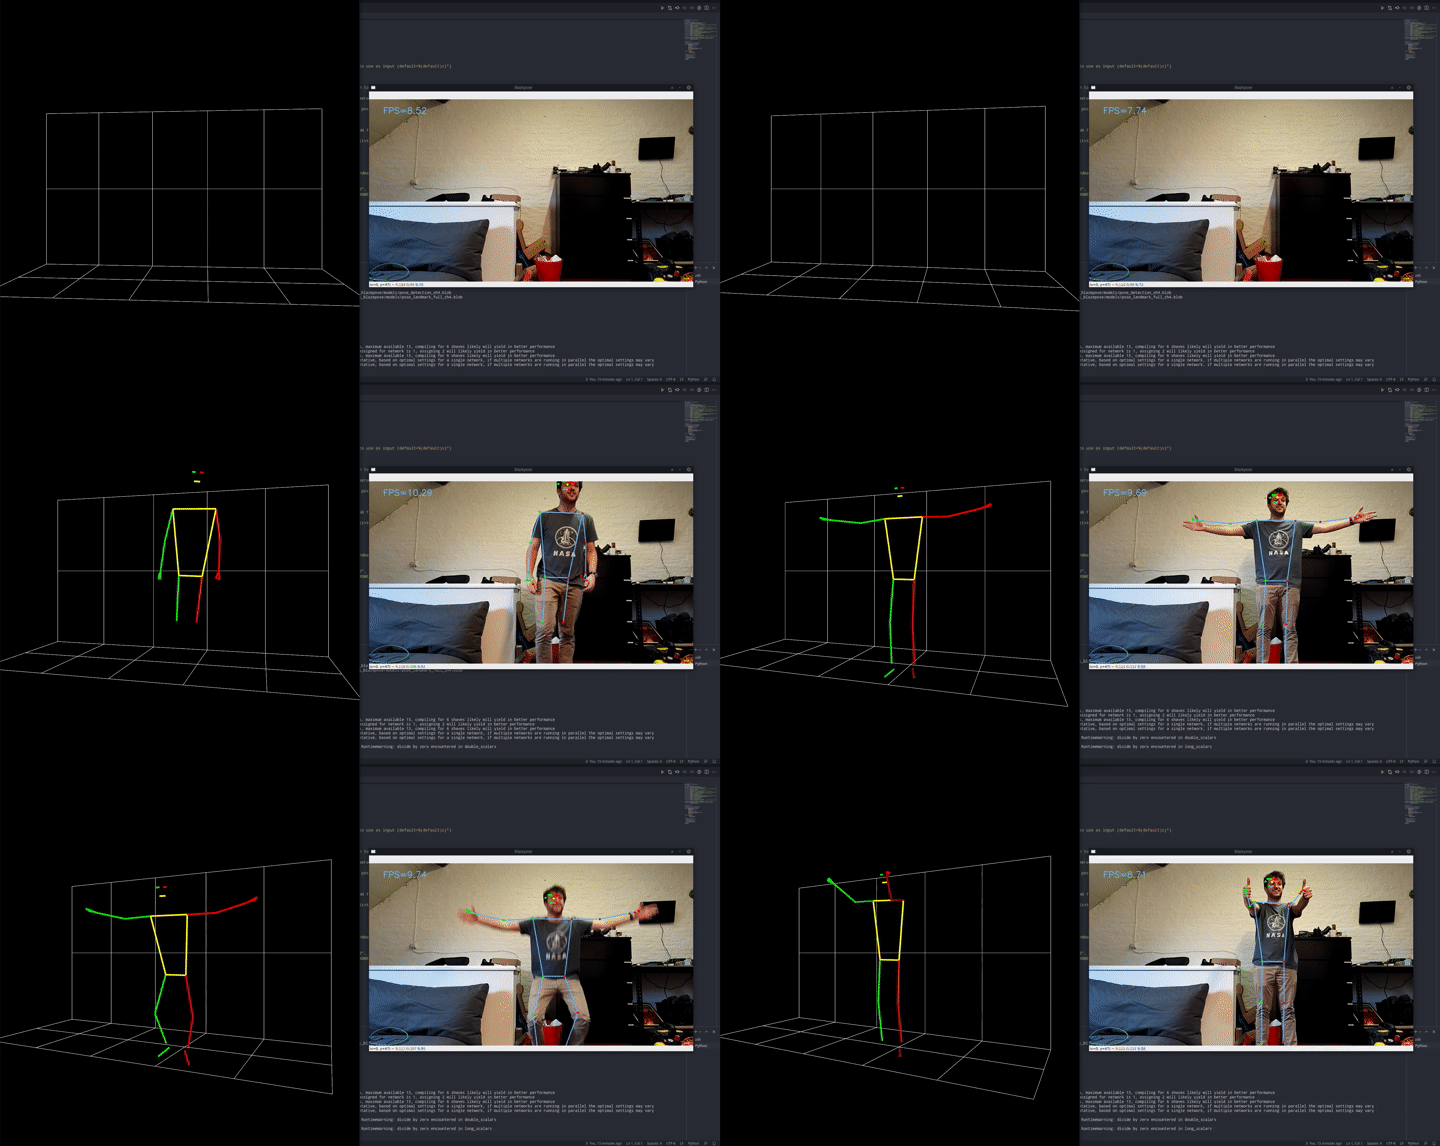
Like I mentioned in the video there were 3 main approaches I considered: video classification, image classification and the pose estimation / classifier hybrid.
The main reason I went with the pose estimation/classifier hybrid approach is that it requires very little data to work correctly and is very robust. In essence, if we want an image classifier to detect pushups, it first has to learn to detect a human, then detect the pose of that human and then detect which kind of action that pose relates to. It needs to learn everything at the same time. Instead, we can specialize and split up the tasks. Use a pre-trained model for everything, except the very last and most specialized task. This will allow the first model to be a little more accurate because it has to learn 1 less thing, and we can train a very very simple model with just a few highly specific labeled samples.
Blazepose was the absolute ideal candidate for this. The model was trained by Google specifically for fitness exercises, yoga etc. so it’s already in the same niche. It also uses some really cool tricks to make it run this fast.
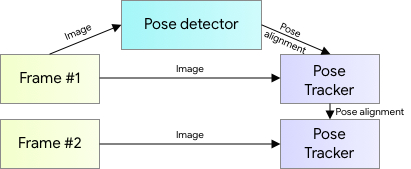
To get the pose of a person, most pose estimators first detect where in the frame that person is and then detect the landmarks within that area. But in the blazepose paper, they assume that a face detector can function well enough as a proxy for a person detector in these kinds of scenarios. So they have a face detector that also predicts some extra data points like: “the middle point between the person’s hips, the size of the circle circumscribing the whole person, and incline (the angle between the lines connecting the two mid-shoulder and mid-hip points).”
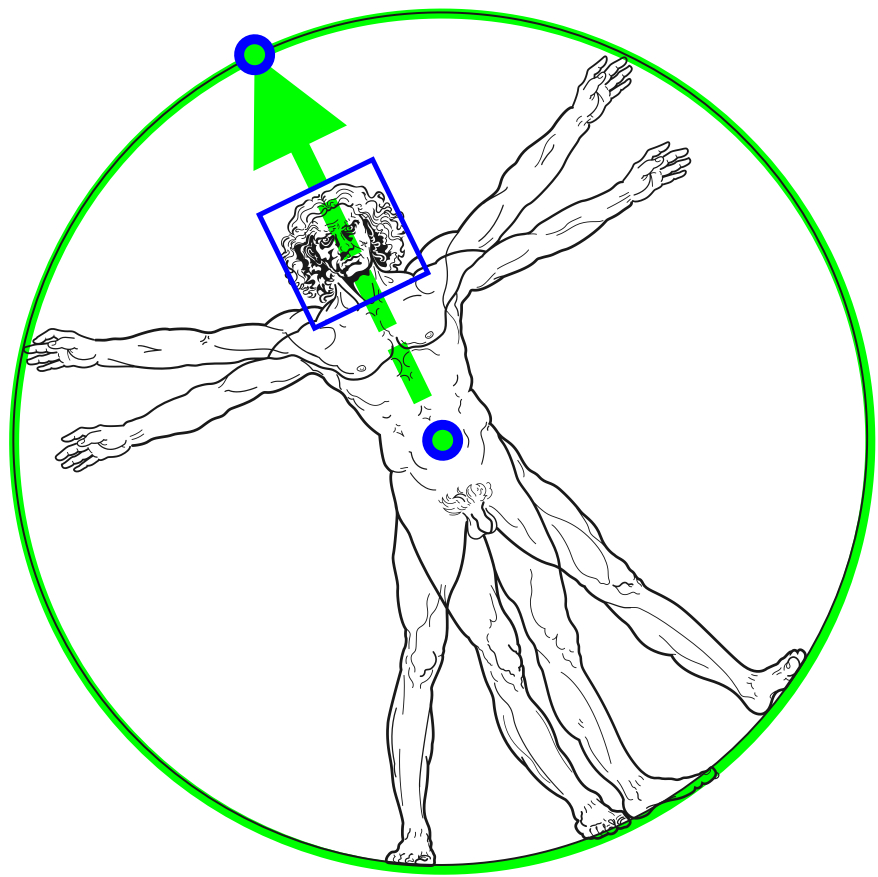
Given these data points, a second model then tries to predict the location of all 33 landmarks at the same time as a regression, but crucially, it also predicts the position of the 2 points in the circle. This is because, in video mode, the first model is only run once to get the process kickstarted and get the 2 points and region of interest. From there the second model continuously updates both the landmarks AND the region of interest for the next pass to use as input. It’s exploiting the fact that in the video, the region of interest won’t change very much, so we only really have to predict a small offset.
OAK-1
Blazepose is fast, but not so fast that it can easily run on a raspberry pi, so I needed something else.
There are so many options here too. I could’ve run it on my computer, on an Nvidia jetson, on my home lab with an API, on a Movidius stick, on Google’s coral edgeTPU, etc. But in the end, I opted to go for the OAK-1, because it’s open-source and already has the camera built-in. (Also my boss was paying and the edgeTPU is cheaper so…)
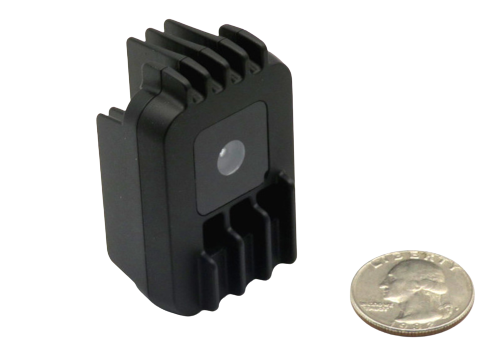
I already fangirled over it quite a bit in the video, but it’s so cool!
It’s powered by the Intel Myriad X chip, which means any models that we might want to use will have to be converted into Intel’s own OpenVino AI framework. Normally, you’d spin up an OpenVino docker container, convert the model and get it out of there. Luxonis also offers an online conversion tool here, but luckily for us, there were 2 absolutely awesome people that made life so much easier.
The first is the legendary (in small circles) PINTO0309. He has a whole arsenal of models and tools he uses to convert from one framework to another and is truly doing god’s work for embedded AI engineers. He converted the blazepose model into many different formats, one of which is OpenVino. Granted, Luxonis also offers a web tool of their own to do it, but it’s never an easy thing to do.
The second one, Geaxgx, was in the video and created the whole framework around the model to pre- and post-process everything and get it running smoothly with the OAK-1. Honestly, this was probably the most effort of the 2 for this specific model, because the paper is not even close to clear on the surrounding processing.
Before finding their repo, I tried to get it done myself, but it’s just a mess. The Mediapipe models, while very good performance-wise, are not so good documentation-wise. E.g. Google’s own blazepose documentation says the model output is in the format of (1, 33, 5) 5 data points for every one of the 33 keypoints in the virtual skeleton. 2×2 coordinates and a visible/not visible boolean. But then you download their own model, throw it in Netron and immediately see 5 output tensors, none of which has a size that can be led back to (1, 33, 5). 33 * 5 = 165, so it’s not the first and the last, definitely not the second which is (1, 1), and also the others are not even close.
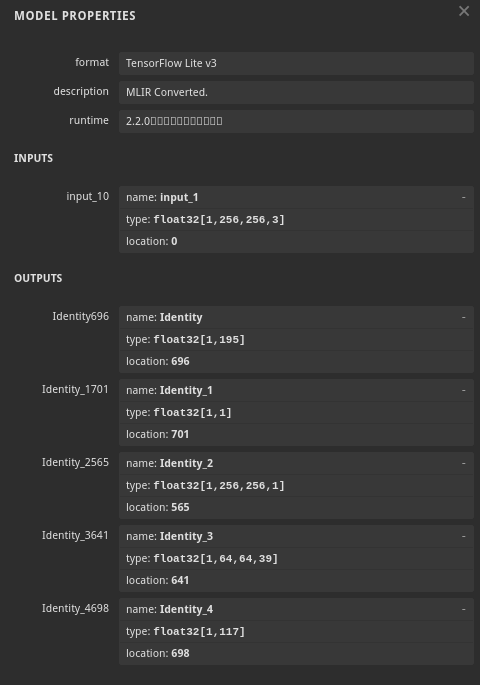
But this repo implements all of the necessary pre and postprocessing, leaving huge comment blocks in between their beautiful lines of code. I don’t know who this is, but I want to hug them. The demo even worked out of the box, which never happens…
Labeling the data
The labeling tool
Now the most efficient way of doing this would be to set a timer to take a picture with me in various poses, do this a few times over, run blazepose over the images and hand label them into which class they belong to, either pushup UP or pushup DOWN.
The much worse solution is doing that but replacing the timer with AI voice activation.
There actually is a really cool Python package to quickly implement this called SpeechRecognition. It even allows you to choose your preferred billion-dollar multinational spycorporation of choice to send your voice recordings to, neat!
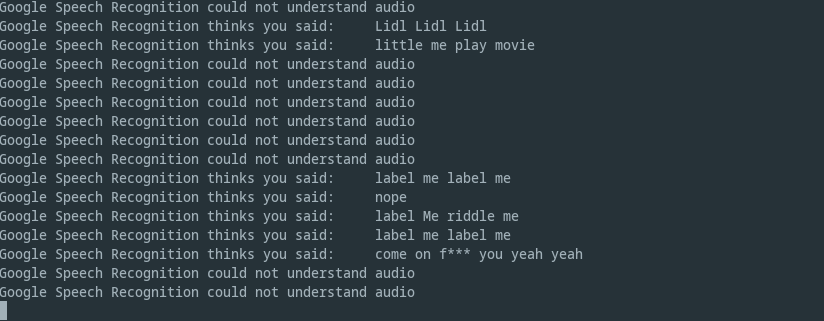
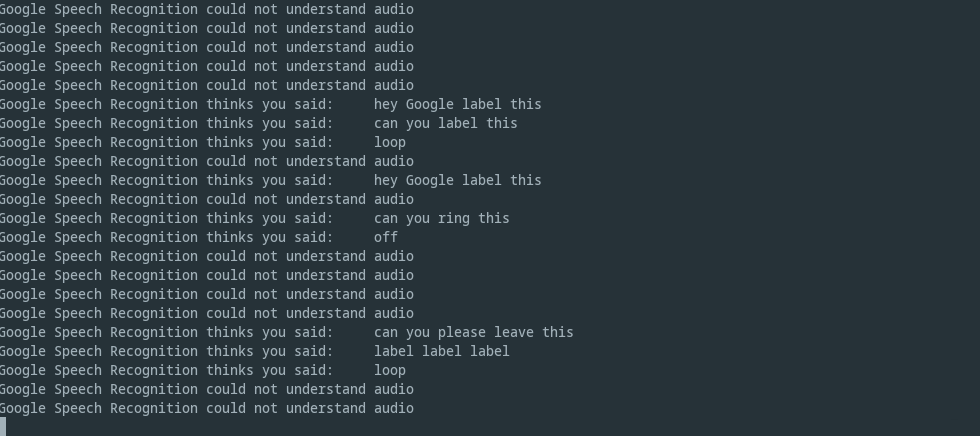
The idea was simple. Just take a picture when the word “label” was detected anywhere in the transcript. Those billions of dollars of investments really did bring value as you can see from the excellent transcripts I have saved during the labeling process. If you saw the video, you know where these come from.
Dataset version management
Labeling the images this way would mean I get a few samples, then quit the labeling tool to rest for a bit, since every label comes with a pushup, it can get quite exhausting. So we’ll be adding newly labeled data over the course of multiple sessions of the labeling tool. Secondly, later down the line, I saw that some labels weren’t picked up at all by blazepose and since I don’t intend to retrain blazepose itself, we just removed these images from the training set. Finally, I’m using blazepose to turn the images into landmarks and we need somewhere to store these landmarks as well.
Adding and removing files left right and center is a disaster waiting to happen. Not to mention the idea of having colleagues or other people add their own samples to the dataset or even completely new classes (situp, squat, etc.) Enter dataset versioning. We want to easily version our dataset and be able to easily share it with colleagues.

So I used our very own ClearML to handle this versioning problem. Essentially I added some simple lines of code to create a new dataset version every time the labeling tool creates some new samples.
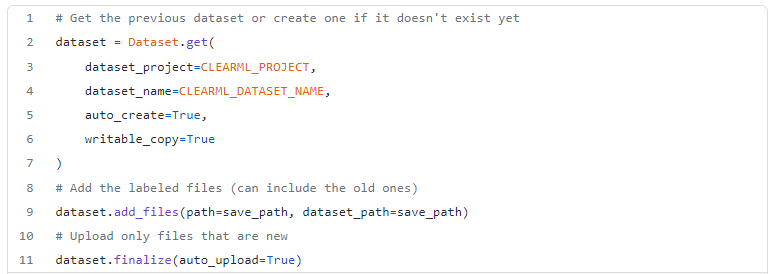
When I ran the preprocessing script, it would fetch the latest dataset version and run the blazepose model over the images. Then it would add the landmarks to another dataset that is linked with the first so I can keep track of it. Then the training script, in turn, fetches the latest dataset version before training. This all actually did save me several times over when I started to manually remove certain files or change the file structure, I would always still know which dataset was which.

As an example: at some point, I decided to get rid of the landmarks that aren’t really necessary for our use case: feet and hand orientation and some facial details. Thanks to this versioning though, I could easily retrain the model on both datasets by simply changing the dataset version and comparing the results using the ClearML experiment manager.
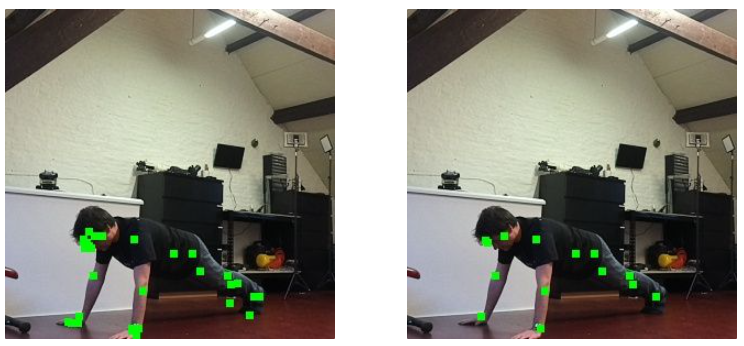
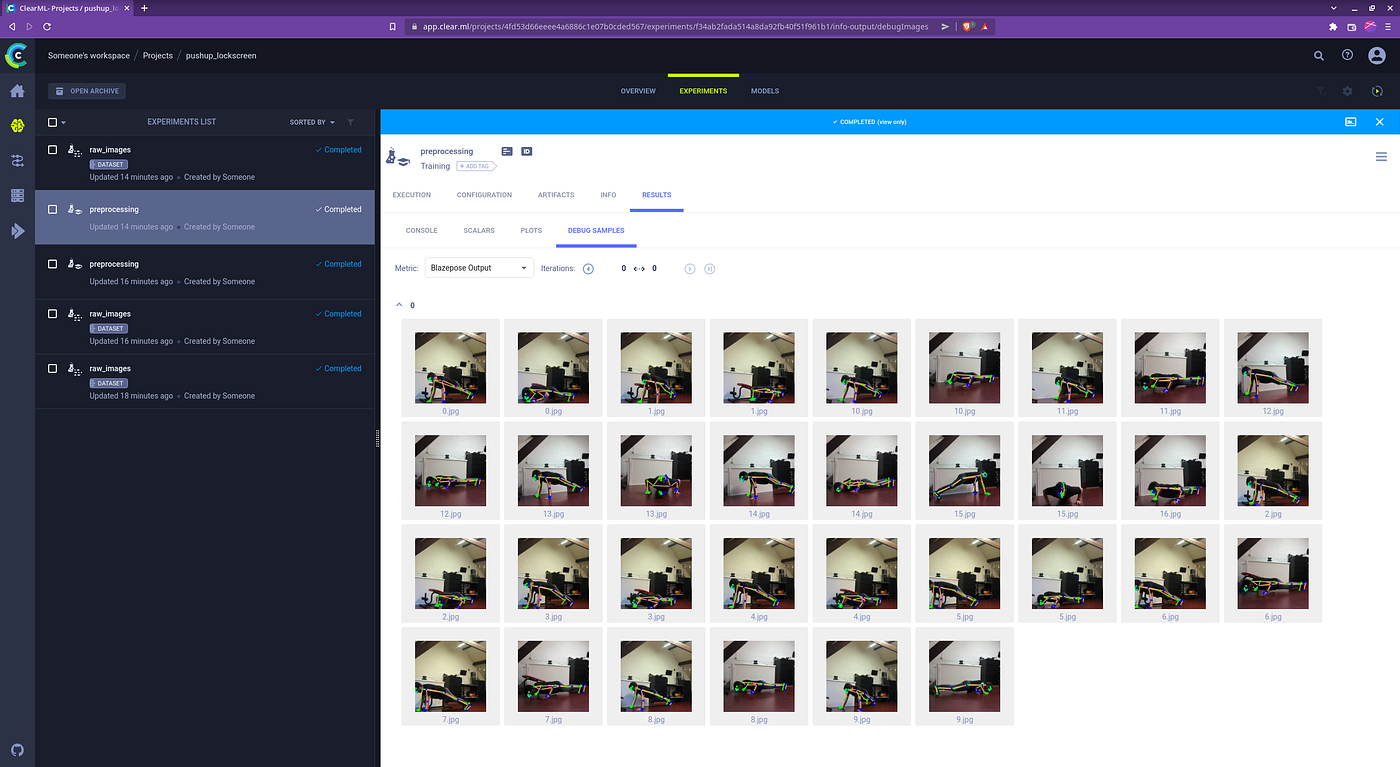
And just to be safe, I could always output some example images as “debug samples” in the experiment manager, which makes it easy to visually confirm that my code didn’t completely suck… this time.
Training the classification model
Experiment Manager
ClearML can also track our experiments. I say experiments, but the approach of ClearML is much more generally applicable, which is why we call them tasks instead of experiments. Any part of your workflow can be considered a task. Every time you run a specific script, it is saved as a task in ClearML together with the parameters, logs, plots etc. Never again will I overwrite a plot or lose my best model on my filesystem. Just dump everything into the experiment manager 😀
In the image below you can see that the preprocessing is a tracked task too and they can be linked with the exact dataset version that they used at runtime. I can also compare different tasks side-by-side which came in very handy when e.g. comparing the model performance with or without the landmark removal I talked about above.

Data augmentation
One can do data augmentation in 2 ways: online or offline. With offline, I would do the data augmentation upfront, create a new ClearML dataset version and store all images in there. This is a good approach when you have virtually limitless storage and a need to feed your GPUs faster than your CPUs can augment the data. Neither of those is applicable for me, so online augmentation it is. This means we’re doing the augmentations at the moment the model is trained and just makes it a little easier to manage everything because we keep track of only a few 10s of images instead of multiple hundreds.
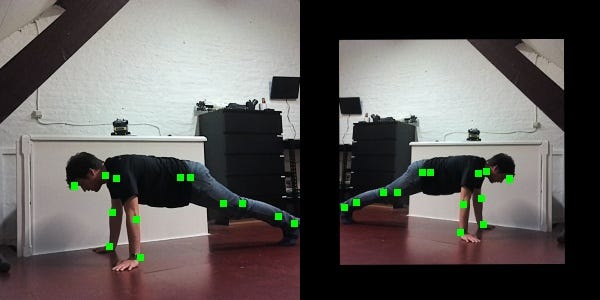
Next to flipping, scaling, and rotating the image, I created one more type of image augmentation myself: landmark jitter. By offsetting the landmarks by a random amount within a certain boundary we can create even more unique samples!
To visualize all of this I used the debug samples functionality in the experiment manager which allowed me to get a quick glimpse at the augmentations, so I can be sure they were done correctly.
Training and Hyperparameter Optimization
The video really didn’t lie in this respect, training the model once all of the above was taken care of was absolute peanuts. A simple Sklearn model was all it took. I did end up using the ClearML hyperparameter optimization functionality to try and get the best model possible, but at the end that was kind of overkill. The 2-stage approach works so well that a simple linear SVM had 100% accuracy on the TEST set. Yeah, you read that right, TEST set.
Usually, when that happens, I immediately curse and assume that I screwed everything up again in the code. It really did take me a whole while of double-checking and second-guessing before I accepted this reality. The beautiful thing about this project though, is that it’s easy to test! Deploy the damned thing and see how well it works in real life in real-time.
Oh yeah, another tip: I used StandardScaler() on my data because non tree-based models like the SVM don’t like the data when it’s not normalized. Never forget to:
- Only fit that scaler to the training data! Same rules as the model itself.
- Save the scaler itself as well as the model file. Use that same fitted scaler on any new incoming data, so there are 2 model files to keep track of.
Again, ClearML helped a lot here. By tracking my experiments, I was also saving both of these files every single run. So if ever I magically found the best model and then ruined my code immediately after (would not be the first time), I would always still have the 2 saved files along with the original code.
Deploying everything
The model
Deploying the model was simple enough, just run the scaler, run model.predict() and off I go. Again, Sklearn was super easy for this when compared to any deep learning system. Getting the model up and ready on the OAK-1 was also simple thanks to Geaxgx’s repo, so it was just a matter of sticking everything together with spit and bubblegum.
The UI
I needed something quick and simple for the UI that could run natively. I’m not seriously going to spin up a god damned javascript webserver and eat half of the pi’s memory just to show a few buttons. Especially not when I might need that memory to run a classifier.
So to any and all people in the same boat as me: use PySimpleGui.
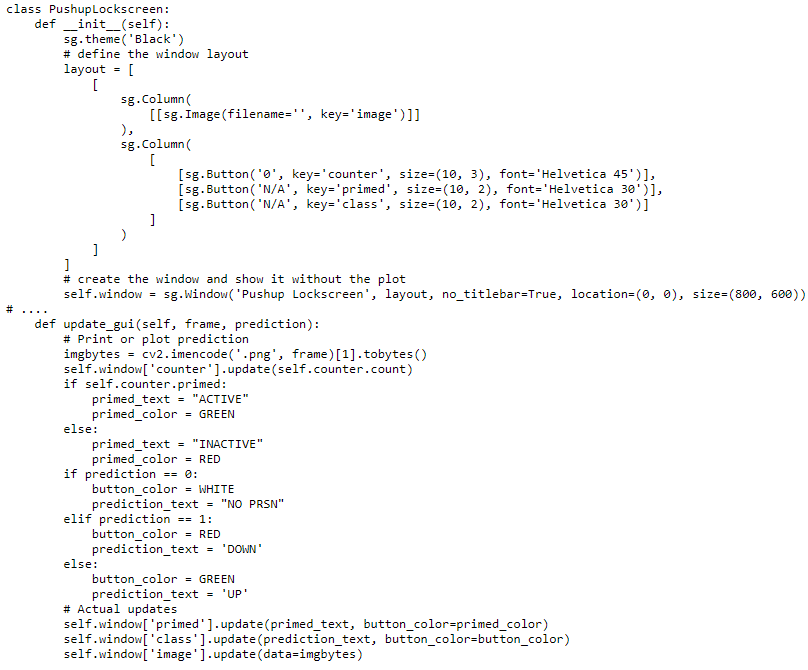
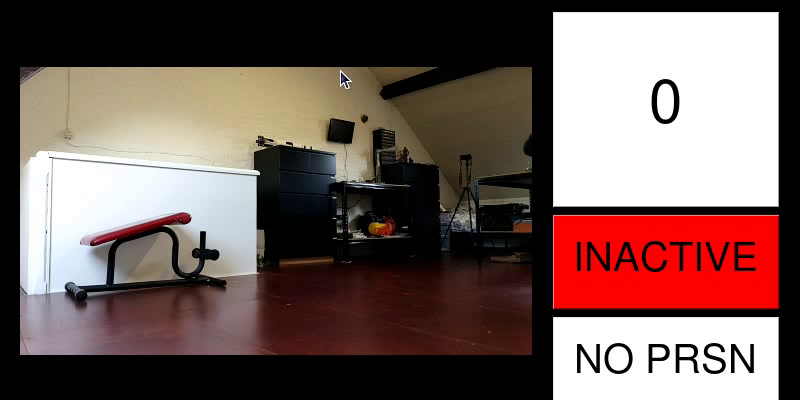
It’s a wrapper around many different UI frameworks like tkinter, wx and qt (my personal fav). But it somehow unifies them and actually does make it simple. The code below is all it took to display the nice UI and I could easily change the colors etc based on the model output as well. Seriously, give it a spin, it’s awesome!
The raspberry pi display
As a final parting gift, here’s a tip on how to enable and disable the raspberry pi 7” touchscreen from the command line. It really served the cherry on top that the screen neatly enables and disables in tandem with the detector.

This blog has been republished by AIIA. To view the original article, please click HERE.
Recent Comments